After posting the Build you own hamster cage – photo guide I’ve received many questions about it, so I’ve asked Ross if he can give some more information regarding measures, materiel, etc.
We hope that you find this step by step guide Ross came up with useful. Please do send us some pictures of your cage if you’ve managed to build it – We would love the see it!

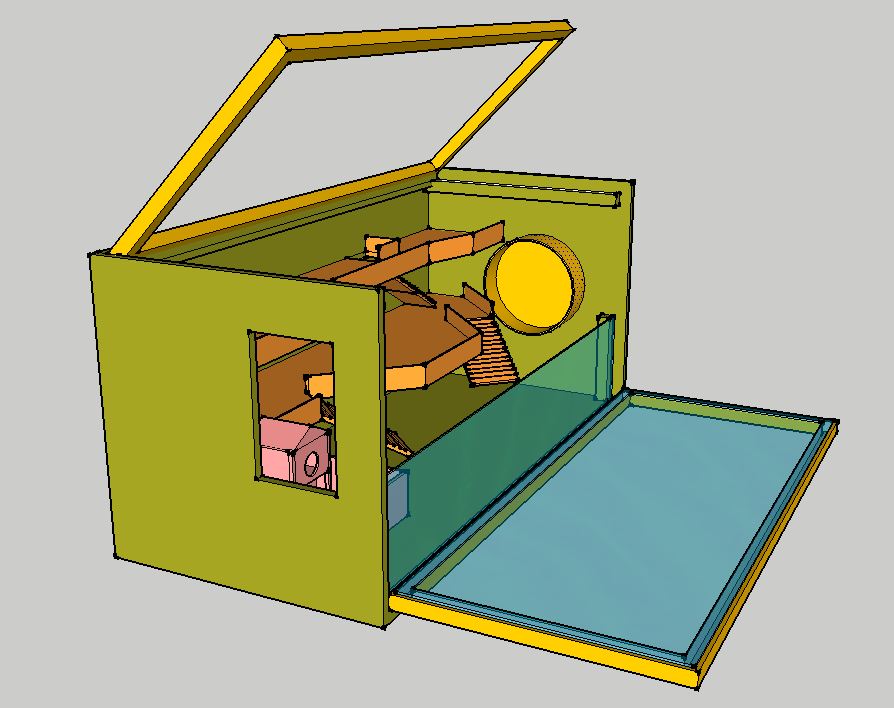
Step by step guide:
This cage is made mostly from standard plywood, 3/4 inch for the base and rear with 1/2 inch thick plywood sides and upper floors. The window / mesh frames are made from 3/4 x 3/4 softwood battens with a small quarter round bead each side of the window/mesh to hold it in place.
Overall the cage measures 850mm wide x 400mm deep x 400mm high
I’ll try and write a rough step by step guide to making it!
Main Cage
1. Cut the back and bottom of the cage from 3/4 inch plywood then screw and glue together (Normal PVA only, butt joint, pre-drill the holes and countersink before driving screws in). Back is 826 x 400mm and base is 382 x 826mm.
2. Cut the sides from 1/2 inch plywood and fix to the base/bottom through the sides in the same method as before. Sides are 400 x 400mm
3. Take your 3/4 x 3/4 softwood batten and cut into pieces to form the frame for your top and window surround, two long and two shorter which fit together with ‘Half lap joints’ in each corner (you can butt joint them, glue and screw if you’re careful but I wanted a glue only joint as it looks neater).
4. Cut more 3/4 batten and fix around the inside of the top to support the top frame when closed.
5. Take your quarter round beads (about 6mm wide I think), cut and mitre them in the corners for a tight fit inside each frame. The bead goes to one side of the inside of the frame so the you can insert the perspex and then repeat the bead the other side and clamp the perspex in place. Beads are fixed with a little glue and tape while it dried (painters tape or masking tape).
6. Attach small hinges to your two frames and mount them in their respective places.
7. Screw a handle on to each one if you like.
8. You’ll need to find a small plastic moulding form a hardware store to make the channel for your perspex to sit in. I ended up using two ‘L’ section plastic trims fixed next to each other to leave a ‘U’ shaped groove to slide the small front perspex wall into. Make it a tiny bit bigger than the thickness of your perspex so it slides in and out ok.
Upper Floors
9. Decide how you want your upper floors to look, bear in mind that you’ll need to have a ladder between each floor so include somewhere for it to start and end with enough space. When you have a plan, cut it out of 1/2 inch plywood and screw fix into place in the cage from the outside.
10. Repeat for the second floor.
11. In our hardware store, they sell pre-formed softwood mouldings of various styles. I chose one which was about an inch by 3-4mm thick to form the little wall around each upper floor. Cut these to length and glue and pin to the sides of your floors to stop your hamster wandering off!
Ladders
12. Get a load of twigs and cut them all the same length (whatever width of ladder you want). Drill a small hole about 1/4 inch from each end in the same direction of each piece. Once you have drilled all of them, get some rigid wire (like metal coathangers) and thread the twigs onto the wire. Repeat for the other end and you just need to bend the wire over at the end to keep them on there. It’s easier to pre-bend the wire into a squared off ‘U’ shape that’s longer than your ladder and thread both sides of the ‘U’ through the twigs at the same time. This leaves only the top two ends which can be bent into hooks which you can then use to support the ladder at the top with little eyelet screws screwed into the edge of your upper floor.
Windows / Mesh
13. When your cage is assembled, measure the hole sizes for your perspex / mesh. Allow a couple of millimeters clearance so that they fit in ok. Our cage had a 6 inch perspex wall in to keep the bedding in when the front window was open.
14. Install the perspex / mesh into the frames and then glue in the second quarter round bead to clamp it in place.
15. I used small cabinet magnets to keep the door closed which were mounted high up on the sides.
That’s it, you’re done!
A few tips:-
When screwing plywood together, always pre-drill the holes and countersink for the screw heads
Make sure everything is square as it gets a lot harder if it’s not
If you need to drill the perspex for any reason, pre-drill it very slowly with a small drill and then with a larger one and so on to stop it cracking
Make sure the ply you are using is nice and flat so it keeps square. If it gets wet, it may twist and the sides will go out of square
Don’t use MDF as it contains some nasty glues
When the cage is built, it’s quite heavy so be careful lifting / moving it
Check your panels after they are cut and adjust the measurements of the next pieces in case they are not quite perfect


Tagged: DIY, dwarf hamster, hamster cage, hamster cage step by step


Im getting my 2 Gerbils and searched for idees of cages , and i came up to yours ! i really really liked this idee ! i’ll be surely happy to try your idee ! Good work !